How I Built a Server-Rendered Form Engine for Shopify
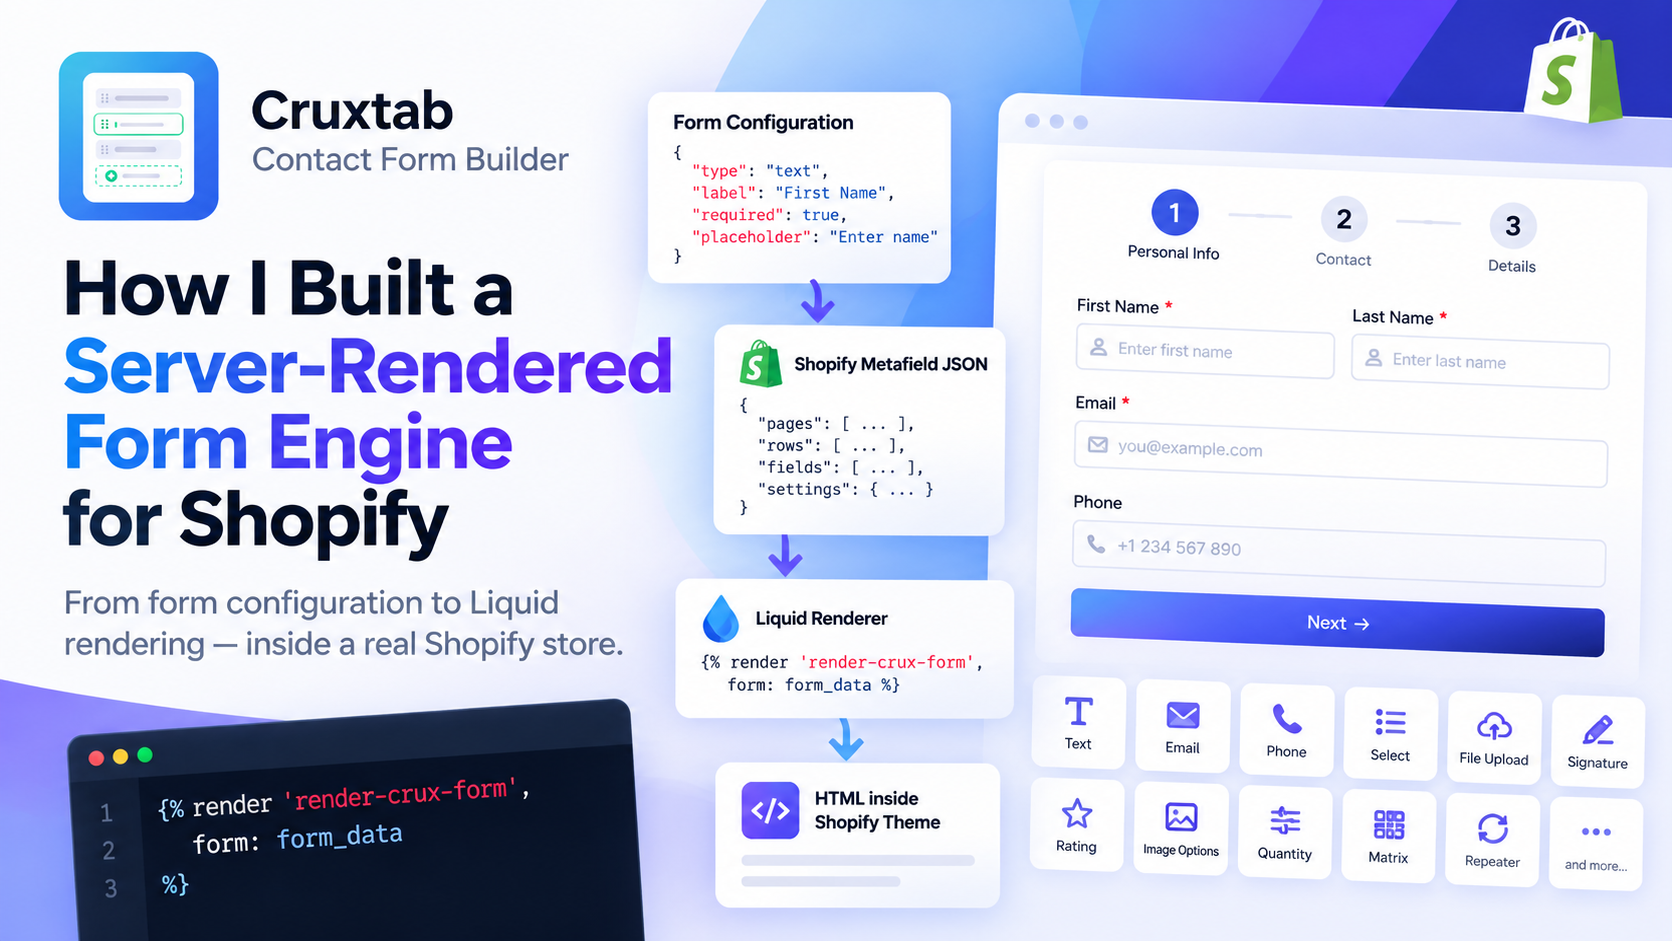
When I started building Cruxtab Contact Form Builder, I knew that creating the form editor would be only half of the problem.
The harder part was figuring out how the form should actually appear inside a Shopify storefront.
A merchant can create a form with different fields, multiple steps, different layouts, custom styling, images, fonts, and other settings. All of that configuration has to eventually become HTML that works inside a Shopify theme.
For Cruxtab, I decided to keep the rendering layer server-side using Shopify Liquid.
This article explains how I approached that architecture and some of the decisions that came with it.
Why server-side rendering?
One option would have been to send the entire form configuration to JavaScript and build the form in the browser.
That approach can work, but I didn't really need JavaScript to construct the initial form markup.
The form configuration already exists as JSON in Shopify metafields. Shopify Liquid can read that configuration while rendering the theme, so it made sense to use Liquid for the initial HTML.
The basic flow looks something like this:
Form configuration
       ↓
Shopify metafield JSON
       ↓
Liquid renderer
       ↓
Form structure
       ↓
Fields / rows / pages
       ↓
HTML inside the Shopify theme
This also meant that the form could be embedded into a storefront without requiring merchants to manually build the HTML themselves.
Keeping the renderer separate
I didn't want one huge Liquid file containing every possible piece of the form.
So I split the rendering responsibility between two main snippets:
snippets/
├── render-crux-form.liquid
└── form-field.liquid
render-crux-form.liquid handles the larger structure of the form.
That includes things such as:
Form wrapper
Header
Pages or steps
Rows
Footer
Layout configuration
Styling configuration
The actual field rendering is handled separately by form-field.liquid.
This separation became particularly useful once the number of supported field types started growing.
Rendering the form structure
A form isn't always just a collection of fields.
For example, a multi-step form might look conceptually like:
Form
 ├── Header
 ├── Step 1
 │    ├── Row
 │    │    ├── Name
 │    │    └── Email
 │    └── Row
 │         └── Message
 │
 ├── Step 2
 │    ├── Row
 │    │    ├── Country
 │    │    └── Phone
 │    └── Row
 │         └── Preferences
 │
 └── Footer
The renderer therefore needs to understand the hierarchy rather than simply looping through a flat list of fields.
The JSON configuration acts as the source of truth, while Liquid turns that configuration into the corresponding markup.
Rows were an important part of the design
One requirement I wanted was the ability to place multiple fields next to each other.
For example:
First Name        Last Name
[____________]    [____________]
Instead of forcing every field to occupy an entire row, Cruxtab allows a row to contain multiple fields.
The renderer can therefore iterate through the fields belonging to a row and output them together.
I allowed up to 10 fields in a single row.
The actual layout can then be controlled through CSS rather than making the Liquid renderer responsible for positioning everything.
This separation is important.
Liquid decides:
"Which fields exist?"
CSS decides:
"How should those fields look and behave visually?"
One renderer, many field types
The next challenge was field types.
A form builder becomes considerably more complicated when it isn't limited to:
Text
Email
Textarea
Select
Cruxtab currently supports a much broader collection of fields, including things like:
text
email
url
password
tel
number
quantity
datetime
textarea
select
radio
checkbox
consent
switch
range
button group
image options
image dropdown
color swatch
color picker
product
rating star
rating level
feedback
matrix
repeater
signature
file upload
There are also static elements such as:
heading
paragraph
HTML
divider
This is where having a dedicated form-field.liquid snippet became useful.
The renderer can determine the field type from the configuration and output the appropriate markup.
Conceptually, the process is:
Field JSON
   ↓
Read field type
   ↓
Determine renderer
   ↓
Output appropriate HTML
The field configuration might describe something like:
{
  "type": "email",
  "label": "Email address",
  "required": true
}
The renderer doesn't need to know where that field was created in the form builder.
It only needs to understand the configuration it receives.
Form configuration lives in metafield JSON
The form configuration is stored as JSON in Shopify metafields.
This was a practical choice because the form contains many different settings.
Instead of creating a separate Shopify metafield for every property, the configuration can be represented as a structured object.
For example, the configuration can contain information about:
Form
 ├── General settings
 ├── Layout
 ├── Styling
 ├── Header
 ├── Pages
 │    └── Rows
 │         └── Fields
 └── Footer
That structure maps reasonably well to the way the form is rendered.
It also makes the renderer generic.
The Liquid code doesn't need to know which merchant created the form. It receives the form configuration and renders it.
Supporting different layouts
Another thing I didn't want to hard-code was the form layout.
Cruxtab supports several presentation modes, including:
Default
Boxed
Float
Popup
The important part here is that the renderer doesn't become four completely different rendering systems.
The form structure remains largely the same.
The layout setting controls which classes and supporting markup are applied.
For example:
Same form data
      ↓
Different layout setting
      ↓
Different presentation
This makes it possible to reuse the same form configuration while changing how the form is presented.
Styling without rebuilding the form
Cruxtab also supports different visual configurations.
These include:
Multiple input styles
Color schemes
Google Fonts
Form images
Color backgrounds
Image backgrounds
I wanted these settings to remain configuration rather than becoming hard-coded styles for individual forms.
The form can therefore receive styling information and expose it through classes, attributes, or generated styling values.
The main stylesheet is responsible for turning those settings into the visual result.
The relevant dependency is:
assets/styles.css
Google Fonts are loaded through a link tag when the selected configuration requires them.
Why I didn't put everything into JavaScript
There is still JavaScript involved in the overall form experience, especially for interactive behavior.
But I didn't want JavaScript to be responsible for constructing the entire initial form.
There is a useful distinction here:
Liquid
→ Initial structure

CSS
→ Presentation

JavaScript
→ Interaction
That separation makes the system easier to reason about.
If a field exists, Liquid should be able to render it.
If the field looks different, CSS should handle that.
If something needs to happen after the user interacts with it, JavaScript can take over.
One problem I discovered: duplicate IDs
Building the renderer also exposed a problem that is easy to overlook.
The current implementation uses hard-coded element IDs such as:
cruxFormWrapper
cruxForm
That works perfectly well when there is only one form on the page.
But Shopify pages can contain multiple app blocks or sections.
If two Cruxtab forms are rendered on the same page, the result can contain duplicate IDs:
<div id="cruxFormWrapper">
  ...
</div>

<div id="cruxFormWrapper">
  ...
</div>
That's not ideal HTML and can cause JavaScript selectors or DOM operations to target the wrong form.
It's one of those issues that doesn't necessarily appear while developing the first version because everything works fine with a single form.
Once you start thinking about multiple instances, it becomes obvious that the IDs should be scoped to the individual form instance.
For example, a future implementation could generate unique identifiers based on the form or block ID.
That is one of the areas I would improve as the renderer evolves.
What I like about the architecture
The biggest benefit of this approach is that the renderer stays relatively predictable.
The responsibility is divided into layers:
Metafield JSON
     ↓
Form renderer
     ↓
Field renderer
     ↓
HTML
     ↓
CSS / JavaScript
The form configuration describes what the form is.
Liquid decides what markup should be generated.
CSS controls how that markup looks.
JavaScript controls what happens when the customer interacts with it.
That separation has made it much easier to add new functionality without completely rewriting the rendering system.
What I would improve
If I were starting the renderer again, I would pay more attention to instance isolation from the beginning.
In particular, I would avoid global IDs such as:
cruxFormWrapper
cruxForm
and generate unique identifiers for every form instance.
I'd also continue looking for ways to keep the field renderer modular as the number of field types increases.
Twenty-nine field types sounds manageable when you're listing them.
It feels very different when you're maintaining the code that actually renders all of them.
Final thoughts
Building the renderer taught me that a form builder isn't really about generating <input> elements.
The difficult part is creating a system that can take a fairly complicated configuration and consistently turn it into something a Shopify theme can render.
For Cruxtab, using Liquid for the server-rendered layer gave me a straightforward foundation:
JSON configuration
       ↓
Liquid
       ↓
HTML
       ↓
CSS + JavaScript
       ↓
Interactive Shopify form
It isn't the only architecture I could have chosen, but for a Shopify app that needs to integrate naturally with themes, it has been a practical one.
And once the basic renderer was working, the next problem became obvious:
How do you support dozens of completely different field types without turning the renderer into one giant conditional statement?
That's where the interesting part of the form builder really started.